This post may contain affiliate links. I may earn an affiliate commission if you click on a link and purchase an item at no additional cost to you. All opinions are my own.
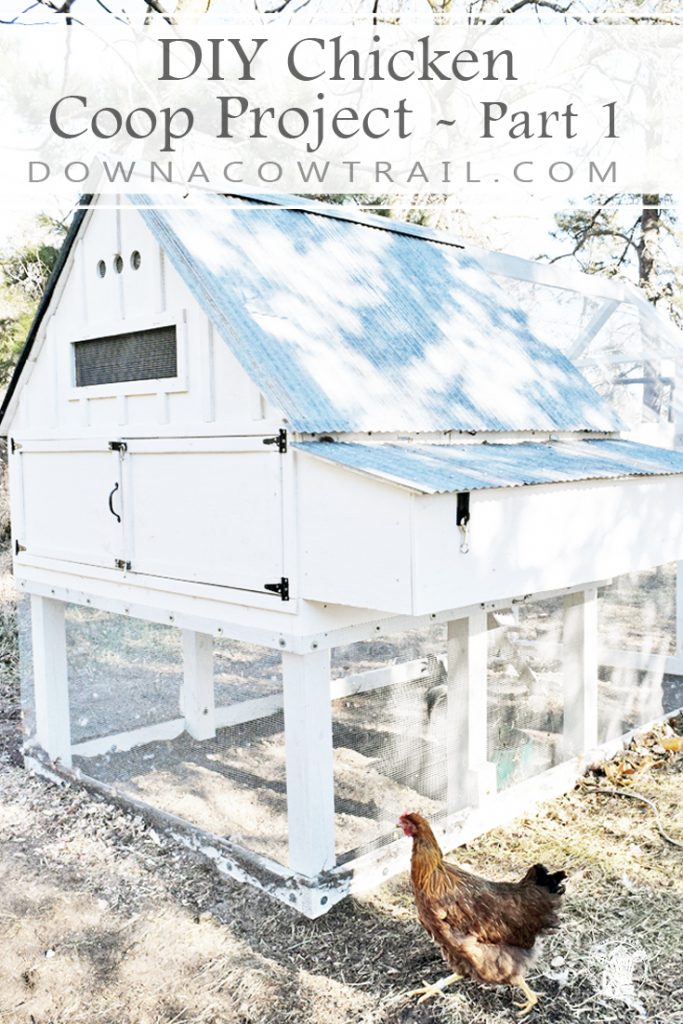
In the beginning…
Before I delve into my Farmhouse Chicken Coop Project, I’ll give you a little chicken history. I bought chicks the year after my husband and I got married. Having no coop up at my house, they lived in my laundry room until they were big enough to be moved down to my in-laws’. You see, my husband’s Grandpa had a nice spacious chicken coop and no chickens (the last of his hens had got eaten the year before).
We moved my chicks down there. I originally had my milk cows down in the same barnyard. That is also where Grandpa’s milking parlor was. Everyday I would drive down to milk Gigi, my Jersey, and then take care of the chickens. That all changed when I had my daughter.
(Before I go on, be sure to follow me on Pinterest and Instagram!)
I drove her down every day to milk my cow. It’s a 2.5 mile drive on our minimum maintenance road. Not bad, but it’s bumpy and I didn’t enjoy bouncing my baby down every day. So I decided I wanted to move all of my “pets” up to our house.
Building my own milking stanchion and farmhouse chicken coop project was high priority for me this year. I wanted to move several of my hens up here and then my mother-in-law could keep the rest down there.
If you already have your own chickens you should check out my free first-aid checklist for livestock!
Who could resist. I mean really.
I was not planning on getting any chicks this year, but my friend found some silkie chicks at the farm store. She sent me pictures of the little fluff balls and the rest is history. I used to raise silkies when I was younger and I missed their sweet friendly personalities.
My dream was for my daughter to have a couple little silkies to raise. So I now had three little chicks who would quickly outgrow their tote. The pressure was on to start my coop project.
Brainstorming
I researched for what seemed like forever to find the perfect plan for me. Turns out I never found one that fit exactly what I envisioned. So I made up my own design. I used Anna White’s chicken coop as the base of the coop building. I knew I wanted it to be at least double the size though. On Anna’s design she has a cute little garden bed on half of it. I wanted to use that space for more chickens. So then began the sketches.
After sketching out several designs, I finally decided on one that (according to my estimate) can house 15-20 chickens. Right now, I have 9 chickens in there and they have plenty of roosting space. I figure the more chicken bodies in there, the warmer they will be in the winter. And so to fill up the new coop, I have ordered some hatching eggs for the spring. They should get here mid-march, so stay tuned for that news!
And now, on to the design.
There are a lot of pictures in this post, so I decided to split my Farmhouse Chicken Coop Project into two parts. Begin part 1.
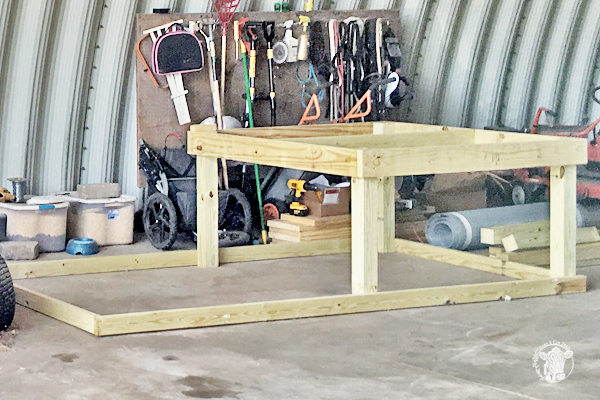
I started with the base. The floor of the house I made the same width, depth, and height of Anna’s design. The legs are 4×4 posts. I used 2×4’s for everything else. This coop is solid enough that I can climb up inside and clean it if needed. From here on out, it is a design-as-I-went project.
I wanted the birds to have space to wander around on the days they couldn’t free range, but I didn’t want it too long that I couldn’t move it. The length of the coop and run together is 8’. Those are the only two boards I didn’t have to cut. For everything else I use my trusty Dewalt Miter Saw that my husband gifted to me for my birthday several years ago. One of my favorite and most used tools.
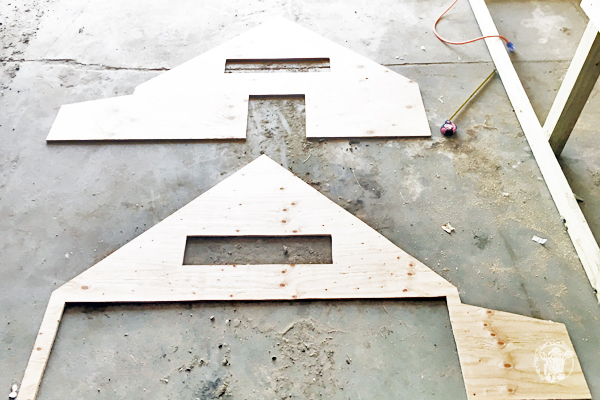
The coop needed to be tall enough that I could walk into the run comfortably. Height at the peak is 7’. I measured the width of my hen house, and then how much higher I needed to go from the floor of the coop to reach 7′. Next, I drew it out on 1/2″ plywood. I then added a bump out for the nesting boxes.
The top of the nesting box is 4″ from the bottom of the roof. You’ll need enough space to place your hinges and clearance for the nesting box lid to open up (a different option would be for the nesting boxes to open from the back instead of the top).
The Walls
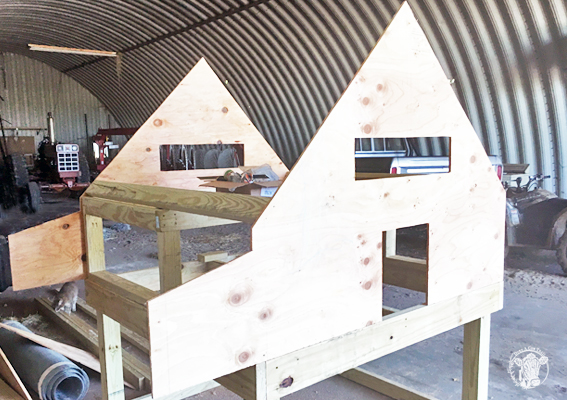
I cut the front and back walls, then set them up on the frame to draw out my doors and windows. You can also see the roost. I built my roost on the floor and lifted it up into place attaching it at the base. I originally had the roosts turned on their side.
Hens need to have a way to keep their feet warm. The more surface area they have to roost the warmer their little toes will stay. I ended up rotating the roosts 90 degrees.
Window & Doors
The windows are for ventilation. They needed to allow air flow during the hot summer days. You can see below the large back door for cleaning out the coop, and the little hatch door in the front.
I used my jigsaw to cut these open. One tip for cutting out a window hole. Drill three holes in a row right next to each other in one of your corners. You just need to make a slot big enough for your jigsaw blade to pop through.
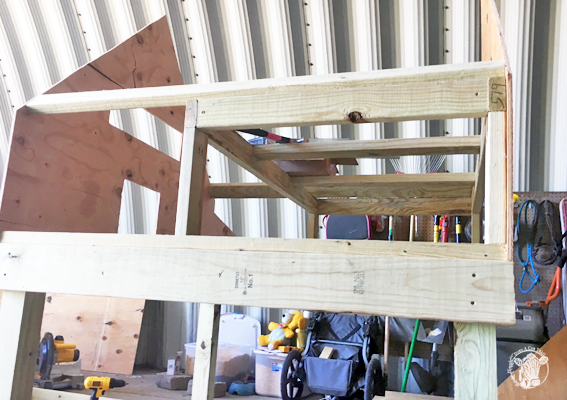
Next I attached the front and back walls to my roost frame. I added the cross pieces to connect both front and back walls. These will also serve as bracing that I can attach the roof to.
See the roosts turned now…Next came the side walls. I added a 2×4 corner post in the front corner to attach the front and side to.
The Patchwork Roof
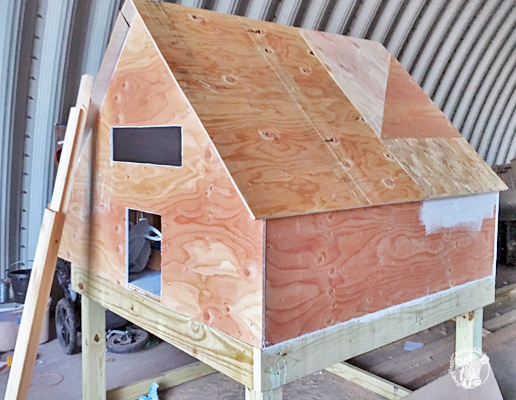
I tried to use as many of my scraps up as possible, so I pieced together the roof with what was leftover from the side walls. Thus why they have a zig-zag cut in the middle.
I had to add in blocking to support the roof (hindsight I should have added more horizontal and vertical cross-pieces for support). The one big snag I ran into, and that always seems to catch me, is if I don’t have the right length of lumber.
We live 25 miles from our nearest town, and I can’t just run into town for a few pieces of lumber. I had to improvise, so I used smaller pieces of blocking to connect the roofing. I may go back in later and beef it up if I need to.
Hoping the slope will keep any heavy snow load off. I can always go sweep it off as well. The roof has a 2″ overhang on all sides except where the nesting boxes are. That one I needed to make shorter to allow for the nesting box lid to open up.
It was all coming together nicely. At this point, the coop had walls and a roof. Next was assembling the nesting boxes and the doors. The doors were made out of the pieces I cut with the jigsaw. I had to trim them down just slightly so they opened and closed easily.
Nesting Boxes
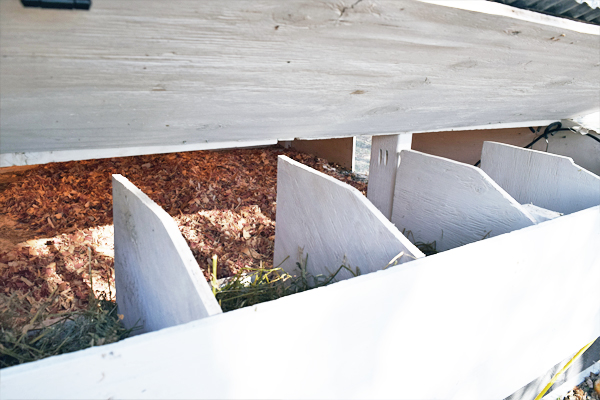
Painting as I went helped me feel inspired to keep going. There is always this moment in my projects where I wonder why I took this on. Usually when I’m sweating and battling mosquitos, or freezing my fingers. This was of course a case of the former…swatting mosquitoes as I went
The nesting box dividers were made with scrap plywood. There are five nesting boxes total. They vary in size, because I have different sized chickens.
Next comes finishing the run, doors, attaching the hardward cloth, roofing paper and tin. This post is quite long, so I will continue the next steps of my Farmhouse Chicken Coop Project in part 2 of this post…
Happy Trails!
Tiffany
 Best Breeds for Beautiful Colorful Eggs
 Keep Your Hens Laying Through Winter
 3 Reasons Why You Need Ceramic Eggs in Your Coop
 Grow Great Chrysanthemums
I don’t need one but your directions for the cool hen house are wonderful!
Thank you!