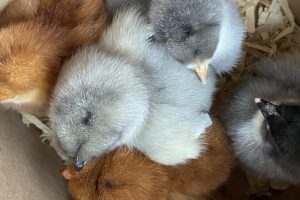
This post may contain affiliate links. I may earn an affiliate commission if you click on a link and purchase an item at no additional cost to you. All opinions are my own.

Incubating eggs and hatching your own chicks is one of the most rewarding experiences you will have when keeping chickens. While it may seem a little daunting, a home incubator is actually so easy!
(Before I go on, be sure to follow me on Pinterest and Instagram!)
What you need to get started:
- Incubator
- Shelf Liner
- Small handheld LED flashlight
- Notepad
- Pencil
- Hatching eggs!
There are so many incubator options out there. Many of them go on sale during Black Friday, so keep an eye out then! But if you are wanting to get started right away you will find several incubators in a decent price range. Last year when I was looking at buying a new incubator I had my sights set on the Incuview.
The Incuview holds 27 chicken eggs and has a really big viewing area. It went on sale over Black Friday, but I had just had our new baby boy and wasn’t sure I wanted to incubate in the spring or just let my hens hatch eggs. Oh silly me…I should have known that I’d get bit by the incubating bug.
So since I missed the sale of the Incuview, I purchased the Nurture Right 360. It’s less expensive and holds 22 eggs. So far it has been wonderful. Both incubators have great viewing with clear lids so you can easily watch your babies hatch (this is so fun to get kids involved with!)
Before my first hatching using the Nurture Right, I read review saying it helps to put down a shelf liner before hatching so the chicks don’t slip (slippery footing can cause leg problems). I had pre-cut the liner and had it ready so before lockdown when I removed the egg turner I just laid down the shelf liner and was ready to go!
My second hatch with the Nurture Right I had a new liner ready to go and laid it in there before the eggs went in. It makes for smoother and quieter turning giving the eggs a little extra padding!
When looking for an incubator, I highly suggest you get one that has good viewing, temperature/humidity controls, and an automatic egg turner! I’ve hand turned, and while it really isn’t hard, I feel like eggs do better overall when they are auto-turned and you don’t have to open the lid several times a day to turn the eggs.
The Incubation Process
If you’ve been looking into incubating eggs, I’m sure you have been reading all you can on incubation methods. I’m not here to tell you my way is the correct way. There are so many variables involved in incubating eggs from fertility of the hen/rooster, to temperature, shipped vs local pickup vs home raised, climate, etc.
In my first hatch in the new Nurture Right, I set 15 eggs and successfully hatched 12 (3 were infertile and never developed). During the first 18 days, I kept my temperature at 100.0 (factory setting is 99.5) and my humidity at 50%.
Some people suggest different temperatures (99.5-100.5) or even to ‘dry hatch’ which means not adding any humidity. It is fun to read different folks’ experiences, but you have to figure out what works for you! My theory is to keep it as close to the Momma hen’s environment as possible.
When going ‘broody’ a Momma hen will pluck out her chest feathers so that when she’s setting on her eggs she has skin-to-egg contact (yep, she’s been reading those natural birthing books!). There will also be a decent amount of humidity under that Momma. Take all of this into consideration when you’re deciding your temperature and humidity.
Candling the Eggs
The Nurture Right has a built in candler, and it works great. I prefer using a small LED flashlight just so I can see all angles of the egg while keeping the large end up. At 7 days (or sometimes 6 if I just can’t wait any longer!), I take a few eggs out at a time to candle. I usually let the incubator rest at least an hour in between candlings so the temp/humidity can recover.
To candle I hold the flashlight in my left hand and the egg (large end up) in my right hand. I very carefully move the flashlight up and down on the egg without tapping the shell with the flashlight. Make sure your hand acts as a cushion between the flashlight and egg so you don’t accidentally crack the shell! You should see veining at this point and the air cell. You can sometimes also see the little baby moving! So fun!

You should use a pencil (not a pen) to mark the air cell to keep track of growth. The air cell sits on the top, or the big end, of the egg. By moving the light up and down you should be able to see the air cell. Another indicator of the air cell is where the veins end. You’ll see the veins stop at the same point where the cell is.
At this point if I see veining I also mark an ‘F’ for ‘fertile’ on the egg. If the egg is completely clear, don’t give up on it. It may just take longer to develop!
Take Notes!
While incubating eggs, I like having a notepad handy to write down all of the different eggs I have in the incubator. I also keep track of which ones are fertile and which ones are questionable.
You should candle again at day 14 and then you can again at day 18 before you go into ‘lockdown’. You’ll see less and less inside the egg as the baby grows, so you really won’t see much at day 18. I skip that candling on most of my eggs and only candle the ones that were questionable so I can remove them before lockdown.
Lockdown
Lockdown is when you stop turning the eggs (my incubator automatically stops turning after day 18) and increase humidity to 80%. At this point if you have a removable turner you should take it out so it doesn’t trap the babies in their eggs. These last three days are so exciting and they feel like the longest days of the incubation period! You should not open your incubator up at all during this time. Let the babies rest and prepare to ‘pip’.
Hatching Time!
Pipping happens when the chicks poke their beak through the shell. This is a whole loooooong process, so be patient! You’ll see a tiny bump or crack in the shell, and then the chick slowly pops the shell away and ‘zips’ the shell basically cutting it with its ‘egg tooth’ (a little sharp ‘tooth’ on the tip of the beak).

I am always so in awe of how God perfectly designed these little chicks. They have a muscle on the back of their neck, the ‘pipping muscle’. This tiny muscle swells as it fills with lymph several days prior to pipping. The strength of this one muscle gives the chick enough power to break through the shell. After hatching the muscle shrinks back down. So incredible!
Once the baby has ‘zipped’ enough of an opening it pushes its way out of the shell. They will look so very wet and contorted when they come out. Just let it be! They’ve been squished into a shell for so long they need to slowly unfold!

Do not assist your chicks during hatching. Some say you can assist, but if you do and other eggs have pipped, you run the risk of ‘shrink-wrapping’ the babies in their shells. Sometimes they pip underneath the egg, so I wouldn’t even risk it unless it is your last chick to hatch and the others are dried off. You also don’t want to risk chilling the new babies if they aren’t fully dried off yet.

Let them rest
Leave the baby chicks in the incubator until they’ve all fully dried off. They have had enough sustenance from the yolk to last them a couple days.

I have made the mistake of pulling chicks out too early and the last one that had hatched wasn’t quite strong enough and ended up with curled toes. I ended up losing that chick. A hard lesson learned. Patience is so necessary for giving the babies time to gain strength.
Where To Buy Hatching Eggs
Oh this part is soooo fun, yet sometimes overwhelming! There are so many hatching eggs out there. I have ordered from Papa’s Poultry and Tarbox Hollow. Both are excellent quality and always include extra eggs. Both of these breeders have many breeds to choose from. You need to find out what breeds you want and then go from there. There are so many poultry breeders you can find on Google, Instagram, or Facebook.
One of the things you need to look for when ordering hatching eggs is NPIP certification. This certifies that your supplier’s flock is free from several serious poultry diseases.
Also look into shipping packing methods. Papas Poultry always bubble wraps each individual egg and also packs the box really well. Look up reviews as to how eggs are shipped so you know what to expect. Your shipped eggs will be slightly traumatized no matter what, but good packing will help!
Taking care of your new babies!
Caring for your new baby chicks after they hatch is easy and often entertaining. I’ve written up a special post here for the basic supplies you need to have ready before your babies hatch!
Incubating eggs and the hatching process is beautiful, and an amazing display of God’s perfect design. It is so incredible. Please comment below with any questions!
Happy Trails!
Tiffany


 Basic Supplies For Baby Chicks
 The Pied Piper on a White Horse
 A2-A2 Milk: What It Is And Why You Need It
 DIY Vintage Stick Horse